
Almost A Charlie Brown Christmas Tree
Christmas is fast approaching! Folks are bustling for Christmas décor to place inside their homes, around the Christmas Tree, or sitting on the fireplace mantle, even on a shelf reserved for Christmas items. These little wooden Christmas Trees are cute once decorated to your liking. Family and friends who are passionate about Christmas will want these.
How would you feel about making them? These trees are easy to make! Just a few minutes of cutting the material and a few minutes of gluing and nailing them together.
Making A List OF Material You Will Need
(“As an Amazon Associate, I earn from qualified purchases”)
- 1x4x8
- Braid nails 16ga. 1 ¼-inch from Amazon
- Braid air gun
- Wood glue
- Small eye hook
- Paint of your choice. It can be green or white
- 1 – 1-inch screw-in hook
Cutting The Material 
- You need 5 pieces cut at 5 ¼ inch
- You need 1 piece cut at 6 ½ inch
- You need 1 piece cut at 7 ¼ inch
- You need 1 piece cut at 10 ½ inch
With your miter saw, tilt the head to the left and lock the head to 30 degrees. With the 1x4x8 lay the board down and cut the end to 30 degrees. Measure 5 ¼ inches from the farthest tip and make a mark. If you want, you can use a speed square to mark across the whole board. Line the saw teeth behind the mark and slowly cut the board.
Cut 4 of the 5 ¼ inch boards at a 30 degree angle cuts going the opposite direction on both ends. See picture on the left. The remaining 4 boards need a 30 degree angle cuts going in the same direction. See picture on the right.

Building The Wooden Christmas Tree
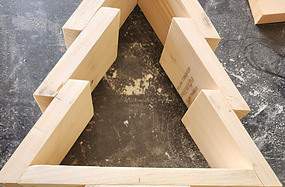
Gather all the pieces of board and place them on their upright sides. With the cut pieces dry-fit them into place to see how the Christmas Tree will look. With the bottom, which is 10 ½ inches, place it against a clamped board at the edge of a workbench or table or you can use a 4×4 post if you have one. Just clamp the 4×4 post down as well.
With the bottom fitted against the board, this will help you dry fit the Christmas tree and help minimize movements as you work with the cut pieces. Place the 5 1/4-inch board with the angle cuts going in the opposite direction to the side. Trust me, somehow this piece will get mistaken with the other short boards.
With the bottom, place the two sides together on the outside of the bottom, forming an acute angle. Place the next two sides overlapping outside and the angle cuts facing downward toward the bottom. The last two boards, the 6 1/2-inch on the right side and the 7 1/4-inch on the left side as the top peak. Check the picture on the right for a reference.
Mark at least 1-inch marks to show where to place the tips of each board. This inch mark is a reference, so don’t go any shorter.
Starting with the bottom, place some wood glue on the tips, and with the braid gun nail them together. Do the same for the sides. Glue the sides together with the overlap at the bottom of each board on the outside and the top going inside. Glue and nail the boards together. With the last two pieces, match the top tips together. The 7 1/4-inch board needs to be the top of the tip, and the 6 1/2-inch tip needs to go to the inside. Glue the pieces together and nail them. 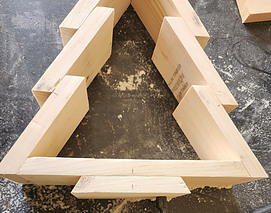
With a tape measure, measure 5 ¼ inches from the 10 1/2-inch board for the center. With the 5 1/4-inch board (the base) mark the center and line the marks together at 2 3/8-inch. Place wood glue on the board and nail the boards together.
With the wooden tree done let the glue dry. Lightly sanding the edges will result in a better appearance when you paint the tree. When painting, be creative and perhaps give your tree an old vintage look. You can lightly even sand some paint off the edges in spots to give the tree an old-aged look.
Decorating The Wooden Christmas Tree
Now comes the fun part! You can decorate this little tree however you want. I saved the last item for last in case you do not want to hang a single ornament inside the Christmas Tree. If you do want to hang an ornament, then twist the screw-in hook from the inside top. You don’t need to screw it all in. Halfway is good enough.
If you are having trouble twisting the screw-in hook further in, then here is a tip for you. You can take a small screwdriver, place the tip through the hook, and move the screwdriver. The screwdriver gives you more leverage.
With the hook in place you can hang your favorite ornament. Also, you can place a small set of Christmas lights around the outside or drape the lights inside by carefully using a staple gun. You can add greenery and holly berries to the top with hot glue.
Since gnomes are popular, you can hot glue the little gnomes to the inside bottom or any other way you want to place them.
If you like this article check out Red Truck Christmas Wall Decoration.


Conclusion
These little trees are becoming a hot trend. Woodworkers and crafters alike are flocking to the idea of making the trees and placing their creative touches on them. Mine is a single ornament in the center with a small display around the Christmas Tree.
If you want to make a lot of these, think of building a few taller Christmas Trees than the others. This will give a variety of sizes if you are to sell them in sets by themselves or placed around your Christmas Tree. The overall size is roughly 12 3/8 inches x 14 inches. Don’t count on having these trees perfect. The imperfections are what give each one of these trees their unique look.
If you liked this article, or have other ideas, please comment below in the comments. If you have any questions, let me know in the comments, and I will get back to you.
Thanks, Homer
I love these wooden Christmas trees! Thank you so much for the instructions on how to make them. I am a bit of a crafter although not much in the woodwork area but I think I will give these a try.
I am very keen to have a sustainable Christmas this year so wooden decorations as opposed to plastic is a great option. I don’t have a nail gun so do you think there would be another way to attach them? Would they be strong enough if i used glue?
Thank you
Hi Elaine,
Thanks for dropping by and liking my little wooden Christmas Trees. I am planning on setting up a booth to sell some wood crafts, and yes, the Christmas Trees as well, at my local Fire Department.
To answer your question about not owning a nail gun and is there an alternative. Yes. You can use several different applications.
You can use a strong wood/construction glue. Once you apply the glue to the surface of the wood, smear the glue around on the wood and put the wood together. You will need small clamps to ensure a good tight bond and seal with glue and wood. The glue will penetrate below the surface of the wood to create a strong bond. A good cure time is usually 24 hours.
I have tested this theory myself. I glued two pieces of wood together and set them aside to dry over 24 hours. I tried to break the pieces apart at the seam. The glue held, but the wood broke behind the glued seam. This showed me the theory is correct and sound. The glue penetrated deep into the wood’s pores.
Here is a small list of construction glue you can use.
Gorilla wood glue
Titebond III wood glue
Apeal premium wood glue
Since you are a crafter, have you crafted anything using the Cricut machines? I own the Explorer Air 2 and make stovetop noodle boards with designs in the center of the boards.
Thanks,
Homer