Oxygen Tank Turn Into A Lamp
A SCBA air tank converted into a lamp? This is so cool. As a curious cat, I decided to make one. This SCBA air tank lamp, I am making it and donating this lamp to my local Fire Department for their annual Auction and Chili Supper. The things a person can make are unlimited. All you need is guidance, tools, and some good music to get your creative juices flowing.
The links within this post are affiliate links which I receive a small compensation of sales from certain items.
In this article, I am going over some steps as I attempt to make this air tank lamp. So, roll up your sleeves, grab your favorite drink, and don’t forget to push play on your stereo, but not too loud. You don’t want your neighbor calling the law on you.
A List of What Materials Needed
- SCBA empty air tank
- A rubber mallet
- A drill
- HSS bits or bits that cut metal with cobalt coating
- 3-in-1 oil
- 1 lamp kit with a lamp shade bracket
- Bench vise
- ½-inch floor flange
- ½” x 2-inch pipe nipple
- ¼-inch lock washer
- 4 1 ½-inch drywall screws
- A sander and 80grit going to 220grit sandpaper
- Gorilla glue
- Braid gun
- 1 ½-inch braid nails
- A hollow log with an open slightly larger than the diameter of the air tank.
- Wood router and a wood bit
- ½ pint Minwax Polyurethane semi-gloss
- A scrap of cabin-grade plywood
(“As an Amazon Associate, I earn from qualifying purchases”)
- A 3.5w which is equitant to a 40w T45 Amber Vintage lightbulb you can purchase from Amazon
- A threaded pipe kit for lamps you can purchase from Amazon
Let’s Hammer On Something!
Check to see if the tank is empty. Turn the valve to open the airflow and let any built-up air released. Even though the regulator reads empty, it is best to check again. Place the air tank on the floor and place your hand on the tank to keep the air tank from moving too much.
If you have a bench vise that will hold the air tank, this would be great. Unfortunately, I don’t have that big of a bench vise.
With a rubber mallet, strike the center of the round dial, hitting downward toward the floor. It may take a few hard hits, but it will eventually come loose, or grab a big purse to hit it with. Once the regulator is loosened, you can remove the regulator by hand.
While holding the regulator in your hand, pull the rubber housing off the regulator. It may put up a small fight, so don’t let it whoop your butt.
Setting Up To Drill
Here is what I did to keep scuffing the plastic on the regulator from the bench vise. Open the vise wide and place a thick shop towel between the sides of the vise. I used an old thick hand towel I use in my shop. I didn’t want my wife to be mad at me because I used a good hand towel. Happy wife, happy life. So, play it safe.
Position the regulator so the threaded valve is facing the jaws. Slowly turn the handle of the bench vise to close the jaws. Stop with enough pressure that you know the regulator will not move. Check to make sure the regulator is straight up and down.
When drilling, drill straight until you reach the halfway point, flip the regulator over and repeat. If you have a 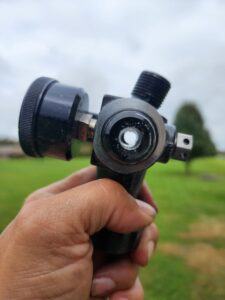 big drill press and long bits that will go through from one side to the other would be great.
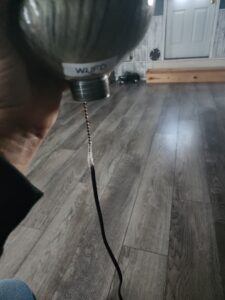
Start with a small drill bit and drill the center to start the pilot hole. Squirt 3-in-1 oil on the bit from the top letting the oil travel downward along the bit.
Have the drill on a slow setting or barely pull against the trigger. You don’t want to drill fast. High speed will cause the bit to overheat and cause it to dull quickly and be useless. Unless you are a cat at a scratching post sharpening your nails, you can sharpen the tip if you know how.
Start with a small bit and work up to the size of the threaded lamp nipple. Stop every 10 to 12 seconds to add oil. With the 3-in-1 oil, squirt a generous amount of oil along the bit. You want the oil to help keep the drill bit cool and lubricated.
Once you have drilled through both sides of the regulator and with an air compressor, with safety glasses on, blow through the hole to rid all the shavings and wipe clean with the show towel.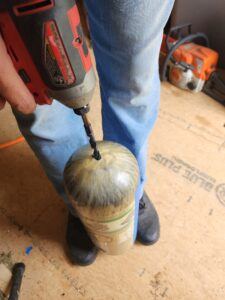
The next thing to do is drill a hole into the bottom of the SCBA tank. Place the top of the tank on the floor and place both feet against the sides of the tank, unless you have a good friend to help hold the tank.
Start with a small drill bit, squirt oil along the top and bottom of the drill bit, and drill slowly into the bottom of the tank. Change the bit and continue drilling slowly and squirting oil. Once through the bottom, shake out any shavings, if any, and wipe clean with the shop towel.
Assembling The Light Regulator
*Note – The threaded nipple needs to be long enough to have enough room for all the assembled parts of your lamp kit.
Place the rubber housing back onto the regulator. Start with the top of the regulator, thread the lamp nipple into the regulator, and follow the directions of the lamp kit, which you can purchase from Amazon, to assemble the top of the light socket and components.
Making The Base #1 And #2
Lucky for me I have a smooth and sun-bleached hollow log that serves as a nice base for this tank lamp. I measured roughly 2 ½ inches on the log. *Note – Secure the iron nipple pipe into the top of the air tank. Measure how long the 1/2” x 2” iron nipple pipe is from the tip of the air tank to the curvature of the tank. This portion of the tank needs to be inside of the hollow log so you can’t see the flange and iron nipple pipe.
If you are enjoying this article then check out another DIY project I recently did: DIY Whiskey Bottle Lamp Lights
Making the base #1
I cut the log out on a table saw carefully using the rip fence to help keep the log steady. If you are good with a chainsaw, you can achieve the same. Sand both sides to give the sides an even flat surface. I used a belt sander. Choose which side will be the top. My top has a network of insect tunnels everywhere.
I took a large scrap of pine board and traced the bottom of the wood and marked a location on the side of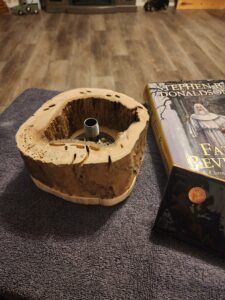 the wood and slid the pine wood to make a mark on the top surface for alignment, then cut the pattern out with a jigsaw. Once the pattern is cut, align the wood and board together using the marks to see how well the edges align together. The better the alignment, the better the base will look.
With the flange mark the center hole and drill a hole through the wood. Flip the board over and make two lines going to the edge. This is where the lamp wire will lay. Take a router and set the depth slightly more than the thickness of the wire. I made several passes to get the width I needed. Glue and nail the two pieces together.  Feed the lamp wire through the center hole, bottom side first.
Making the base #2
For the second base, I cut out a section of a ¾-inch plywood. Place the bottom of the tank base on top of the ¾-inch plywood and mark 3 inches around the perimeter of the lamp base. I would suggest keeping the same irregular shape of the wood. It doesn’t need to be precise. You want to keep the same shape, only wider.

With base #1, spread Gorilla glue on the bottom and place it on base #2. Make sure the lamp wire is lying flat within the channel you carved out with the router. You can either wait for the glue to dry or use two wood clamps to hold the bases together. I ended up using the clamps.
With the flange and nipple assembled, feed the wire through, and secure the flange to the wood with the washers and the 1 ½-inch screws.
Assembling The SCBA Tank
Thread another lamp nipple into the bottom hole of the SCBA tank, which is now, the top. Make sure you have enough threads in the tank. The next thing to do is have the wire fed through the tank. I used a long pull chain (you can buy them at any hardware store) and taped the wire ends to the chain. Make sure you have enough lamp wire to attach to the light fixture. Assemble the tank to the iron-threaded nipple and tighten.

Pass the wire through the regulator and the lamp fixture. Next, pull the two ends of the wire apart and tie the two ends together so the wire will not be pulled back, through the lamp nipple. The wire with the ribbed or writing on the outside casing goes to the silver screw, and the other wire to the copper screw. When attaching the wires to the screws, form a hook and place the wire on the left side of the screw. When you tighten the screws to the wire, this will help to pull the wire closer to the screw.
Assemble the rest of the lamp fixture and screw the bottom of the regulator to the threaded nipple on the tank. Make sure you have enough threads in the regulator.
Once the lamp fixture is complete, according to what type of lamp kit you have, it is time to stain or seal the two bases. I used Minwax Polyurethane clear semi-gloss to give a glass look when dried.
Final Thoughts
Making the SCBA lamp was a little challenging due to drilling through the regulator, but with determination and a lot of 3-in-1 oil, I accomplished this feat. Assembling the SCBA tank and light fixture and making the bases was a breeze.
Just before the day of the Fire Department auction, I ended up changing the lampshade to a light gray medium size, which gave the SCBA lamp a better look. I also used the LED vintage-style amber glass T45 40w. These type of lightbulbs give off a warm appealing look.
While the SCBA lamp was sitting at the Fire Department, people kept asking about the lamp, and who made it.
As always, when using power tools, use your PPE and stay safe.
What would you have done differently? Would you use maple or mahogany, or perhaps walnut for the second base? Let me know what you would have done differently in the comments below.
Thanks,
Homer
Affiliate Disclosure Glass Block Whiskey Decanter DIY Whiskey Bottle Lamp Lights
This Article, is very good ,great how you explained all the steps .And where.to buy all the tools, to make one of these lamps.this is a beautiful lamp I’m sure the fire dept , Appreciated the donation .
Thank you, Janice!
The fire department loved the SCBA cylinder lamp. The lamp helped the department raise money. Members from the fire department asked if I would make more. It seems a lot of people were bidding on the SCBA lamp and were outbid or didn’t get the chance to bid.
As to where to buy some of the items I have listed, it seems buying from Amazon is the best option. I have recently gone to Lowe’s, Hobby Lobby, Michaels, and a few other craft stores searching for lamp kits and left almost empty-handed. In reality, it is better to shop and buy from Amazon.
I have researched for the best price and best items needed and listed in this article.
Thanks, Homer