Set the Right Mood
If you’re planning to host a party and want to impress your guests with a stunning charcuterie board, why not make one yourself? Crafting a wood charcuterie board is a handy skill that every host should have under their belt. With a little patience, attention to detail, and some basic tools, you can easily make a gorgeous and functional wood charcuterie board. So how about making a 3-D tumbling blocks?
Selecting the Wood
Start by selecting a piece of hardwood (such as maple, hickory, and mahogany) that is at least 2 inches thick and wide enough to accommodate your favorite meats, cheeses, and fruits. Cut the wood into a shape that suits your style, such as a rectangular, oval, or round board. In this case, I cut mine as triangles. I cut twenty pieces each from all three types of wood.
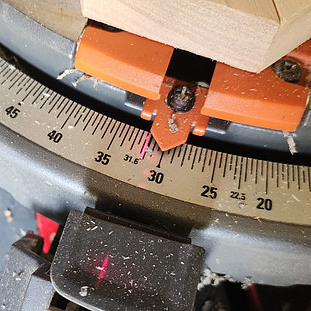 Take a 1”x4”x8’ and rip one side measure 1 ¾”. Set the miter saw at 30 degrees and lock it down. Cut the end of the board and you will have your first 30 degrees angle cut. Now set a jig against the point of the angle of the board. You can use a scrap piece of board and clamp to hold the wood in place at the end of the saw. I have a long squeeze clamp and was able to clamp over the scrap wood and edge of the bench.
Take the tape measure and measure 2” from the tip of the angle. Lower the saw blade down to check. The four sides should measure 2” after each cut. Measure all pieces at 2” with a tape measure to form a perfect cube. There is a high chance that you will need extra pieces because you will have some cuts that are not accurate. But that’s okay, the sun will still shine down on you.
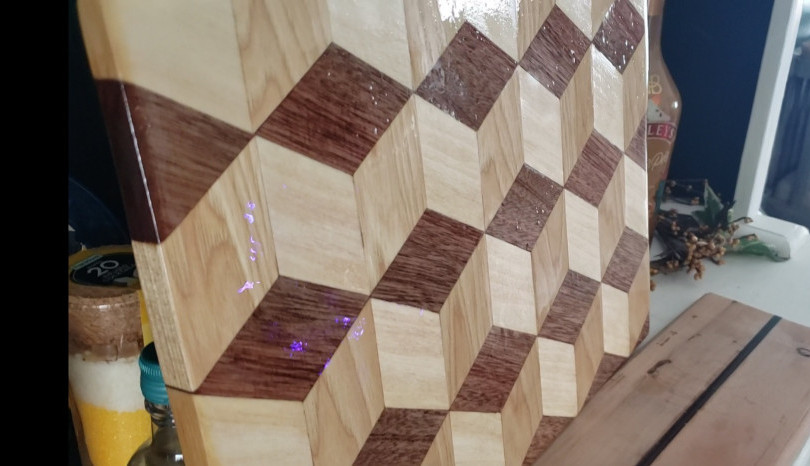
When I put all three pieces together (maple, hickory, and mahogany) they form a cube with different highlights. The lightness from the hickory would form the top of the cube and maple the left side of the cube and mahogany the right side of the cube. This pattern creates shadows and when all three types of wood are together, a dazzling 3-D effect is displayed. 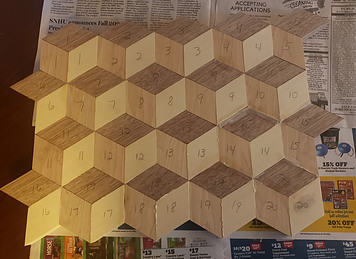
With all the pieces cut start laying them out on a board wide enough with newspaper. Do a dry run and put the three types of wood together forming the cube. Repeat the pattern. The way I did mine was four cubes and a half. Drop back to the first cube and repeat the pattern and stopping at 10 drops back to 6 and repeat the pattern. Stop at 15 forming half a cube. Now going back to the left start under cube 11 with half a cube and finish the last row out with cube 20 forming a full cube.
If all the pieces are forming tight lines, then pat yourself on the back. If not, well, you can always try again. It’s almost like winning the lottery.
Dry Run and Gluing
Once you have the dry run or mock demo done and all the wood grain is running in the same direction it is time to start gluing. I used Gorilla wood glue and brush only the sides connecting each other. You don’t need a lot but brush all exposed areas of the wood. Start putting the wood pieces together and keep them tight together. If you want use can use long squeeze clamps and clamp a few pieces together at a time.
Cutting the Board
Once the glue is dry for twenty-four hours it is time to sand the board. This will give your charcuterie board a polished look and prevent any unpleasant splinters from harming your guests (You wouldn’t want your guests to start throwing food at you but it’s your party after all).
After the board is dried it is time to cut the board into shape. Your choice of what you want to use but I used my table saw. I squared my board by using a 2-foot framing square and outlined what I needed to cut off. Once I was satisfied, I slowly cut off the excess from the rectangle board.
Now it is time to sand the board. No not sand the floor like Mr. Miyagi wanted Daniel-son to do in the Karate Kid movies. After sanding, wipe the board clean with a damp cloth several times. Not too damp because this will cause the wood fibers to release themselves and the surface will feel rough.
Sealing and Preserving the Board
Next, apply a food-grade finish to the wood. Consider using mineral oil or beeswax, both of which will protect the wood and make it resistant to stains and odors. (“As an Amazon Associate I earn from qualifying purchases”) For my first sealing process, I soaked the board in mineral oil for twenty-four hours and let it dry. After the mineral oil dried, I applied Walrus Oil letting the oil soak in till it dried and applied another coat of Walrus again. Apply the oil in a circular motion, ensuring that it covers every inch of the board.
Let the oil dry completely overnight, then wipe away any excess with a clean cloth. Lastly, add some decorative elements to your board, such as handles or feet that elevate the board off the table. These finishing touches will complete the look of your board and make it easy to carry and serve.
To clean do not put the charcuterie board in the dishwasher. For Heaven’s sake! You will cause the dishwasher to throw the board right at you scream, “Are you nuts!”
All you need to do is wipe clean with a damp cloth to clean and cut a lemon in half and use the lemon to disinfect the wood. Let dry and apply Walrus Oil in several coats letting each coat dry.
The links within this post are affiliate links of which I receive a small compensation from sales of certain items.
Final Thoughts
With these simple steps, you’ll have a beautiful handmade charcuterie board that can be used for years to come. Plus, your guests will be impressed with your craftsmanship and attention to detail. So, why not give it a try and make your own charcuterie board today?

Click on the Amazon picture of charcuterie serving utensils
All comments and opinions or questions are welcome. You can leave them below here.
Thanks, Homer P.