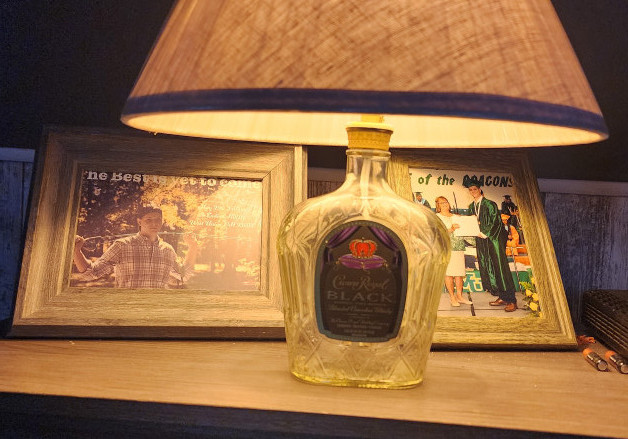
A Light Dazzling Display
Have you ever wanted a lamp made from a whiskey bottle or even seen one? What about owning a unique whiskey bottle lamp? Especially, if you made it yourself. It all starts with what type, size, and color of the glass bottle.
This is one DIY you want to make and have your family and friends ask, “How did you do that?”
Also, you can use a bourbon bottle as well. An interesting fact about the bottles is the design that influences the buyers. It is a wow factor that catches the consumers to buy the bottle and its contents. (I must have it!)
Picking the right bottle for the appropriate theme for your home is important, and with a few careful steps, I will show how easy it is to make a whiskey bottle lamp light.
Materials Needed for a Small Lamp
(“As an Amazon Associate, I earn from qualifying purchases”)
- A small empty whiskey or bourbon bottle of your choice
- A bottle light kit with rubber bushings (optional, I used the original cap)
- A drill
- A 3/8-inch diamond drill bit
- A 5/16-inch drill bit and smaller bits for the starter hole working upwards till you reach the 5/16-inch bit size
- A light bulb (for that exotic look, I went with LED vintage Style T45 amber glass 40W with a brightness of 200 from Amazon
- Additional lamp repair or lamp accessories with nuts and threaded pipe nipples of various small lengths for lamps from Amazon
- A glue gun and one stick of clear glue stick
- A shoestring or a long thin wire
- A small flat-tipped screwdriver
- A small cup of water (and that’s free!)
Altered Optional for a Wood Platform Base
- A wood base
- 3/8-inch bit
- 9/16-inch spade bit
- Oversize washer to go over threaded pipe
- Threaded pipe that includes the height of the wood base, bottle and light fixture (you can cut the pipe to fit
The links within this article are affiliate links which I receive a small compensation from sales of certain items.
Let’s Build It
With the whiskey bottle, lay it with the front facing down. The bottle needs to lay flat on a solid surface or have someone hold it. The hole for the wire will be near the bottom of the bottle. Depending on your preference, you can use the glue gun to make a small circle of glue and build it high enough to hold water. Either pour a little of water into the glue dam or have a small cup of water to dip the diamond bit into the water to keep the bit cool and the glass dust down.
Put the 3/8-inch diamond bit into the drill. Most drills have a low speed. Select the low speed or use your finger on the trigger with enough pressure for a slow speed. Low speed and plenty of water is a key for a successfully drilled hole.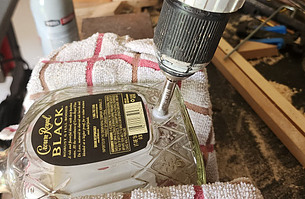
If you have not dipped the diamond bit into water, do so now. With the drill slightly tilted, place the bit at the desired spot for the hole and slowly pull the trigger. The bit will try to walk around so hold the drill with both hands. It is important not to have a lot of downward pressure. Let the bit do the work.
Once the diamond bit scores and stays in place and you are sure to control the drill bit, slowly straighten the drill as you are drilling. Periodically, dip the bit in water if you are not using the glue dam.
Before you are about to go through the other side of the glass slowly let the drill bit “eat” at the glass with hardly any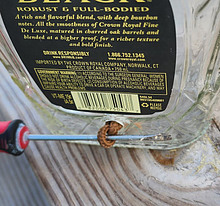 resistance. You don’t want a blowout. This could rupture a large chunk of glass on the inside and compromise the look.
Once through the glass, rinse the bottle out and remove the dam of glue (if you went with this method). Grab a small threaded pipe nipple and either use a shoestring or the thin wire. With the shoestring tie a small open-hole knot so you can hook and pull through the hole. I used a shoestring. Bend the end at a 45-degree angle if you are using wire.
Ready For the Light
The next step is placing a nut onto the threaded nipple, stopping about a quarter of the way on the nipple. With the bottle upright put the small nipple with the lock nut on top onto the shoestring/wire with the knot or bend to catch the nipple and lower the nipple into the bottle. With the screwdriver, hook the open knot and drag the knot through the hole. Once the knot is through take the tip of the screwdriver through the nipple and carefully guide the nipple through the hole.
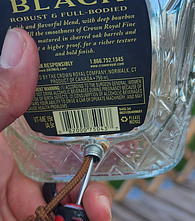
Now here is a great trick. Remove the screwdriver and carefully grab another lock nut. Put the screwdriver through the nut and place the tip into the nipple to help hold the nipple in place. This will allow you to screw the nut onto the nipple and stop about 1/8-inch from the bottle. Here, you will need to heat the glue gun with the glue stick in it.
While the glue gun is heating up, you can remove the shoestring/wire and put the cap on to the bottle. With a small drill bit, mark the center of the cap and drill through. Next, go up in size, drilling a hole in the cap until you reach the desired size you need. In this case, I needed a 5/16-inch.
With another threaded nipple, choose a long nipple so you can screw the light fixture on top and through the cap. I had to screw the light fixture to one end to help thread the nipple through the hole in the cap. Once you have the nipple through the cap use another nut and tighten it to the bottom side of the cap.
The next step is to take the fixture back off so you can work on fishing the lamp wire through the bottle.
The glue gun should be ready to use. With the screwdriver, place the tip between the glass and the nut to create a gap. Quickly dab a little between the nut and glass. You do not need much. This is to keep the nut from loosening up in the future. Quickly put the tip into the nipple opening to hold pressure and tighten the nut tight against the bottle. If the glue dries before you tighten the nut, cut the dried glue away and try again.
Now comes the fun part. Take the lamp wire and thread the cut end through the bottom hole. You can hold the bottle upside down if you want, I did. After a few tries, I fished the wire through the top.
If you are enjoying reading this article, then please check out another DIY I recently did: SCBA Cylinder Lamp
Let There Be Light
Holding the wire from the top and the light fixture in one hand, I measured what I thought I would need and made a small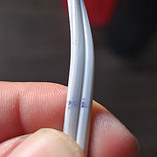 mark with an ink pen at the bottom hole on the wire.
Pull the excess up through the top and feed from the bottom till you reach the ink mark. Make a loose knot at the mark and pull the wire back through the bottom hole while feeding from the top. You don’t want to cut the wire coating. Put the light fixture and threaded nipple and the large flat cap washer, if supplied in the light kit, together. Feed the wire through the bottom nipple.
Pull the light fixture apart so the inside screws are exposed. If the wires are not already stripped, then strip the coating on the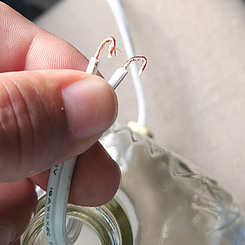 wire about a quarter. Do the same for the other wire. Take both ends and curve the ends to form a “J” or a hook. Attach the ribbed wire or wire with the writing on it to the silver screw.
It is important to place the hook end on the left side of the screw. While tightening the screw, this will keep pulling the wire inward to the screw. The other wire you will attach it to the gold screw. This is the hot side.
Ensure the wires are secured then push the jacket and insert back together, aligning the crimps. Push the wire back into the top of the bottle and screw the whiskey bottle cap back on. Check on the alignment of the toggle of the light fixture. I like mine to face the side of the bottle, meaning left or right when facing the bottle.
With the light bulb of your choice, screw the bulb in and the clip-on lamp shade placed over the bulb plug the whiskey bottle lamp into a wall socket. If it doesn’t come on, check for the toggle switch, it might be in the off position.
For a Wood Base
Note that this is a different optional method. If you want to have a wood base, then follow these steps (I am still looking for the right piece and size of wood for my base but I went ahead and demonstrated with this hickory). Here, a person can use a threaded pipe nipple the same height as the wood base and the bottle with the new light fixture instead of the small threaded nipple in the cap. 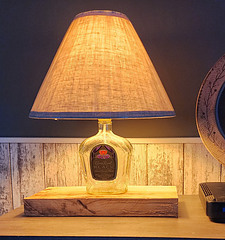
Another step that will be different is drilling a hole through the center of the bottle of the whiskey bottle instead of the side at the bottom.
On the bottom of the wood base, drill a hole for the threaded pipe to slide through. Next, with the 9/16-inch spade bit drill the hole deeper so the washer and nut is below the surface. Take a small washer and two nuts and tighten against the wood drawing the whiskey bottle tighter to the wood.
With the wood base, you can get as creative as you want.
Final Thoughts
Creating whiskey bottle lamps can be fun and very creative. As an afterthought, I want to fill the bottle with something cool. I have asked a few people for suggested coffee beans, coins, and golf tees.
What are your thoughts on what to use as a filler? I would like to hear what your thoughts are.
As always, leave your questions or comments below.
Thanks, Homer Patrick
