Are you looking for easy idea hacks? Look no further! Those hacks are right here, within this article. I have nine hack ideas for woodworking. These tips and tricks can save time and money based on the needs of how you apply the ideas.

 1. Sticky Notes
Do you hate it when you are on a ladder, and you come down the ladder and walk over to your miter saw or table saw, and you forget the measurement? I will admit I have forgotten the measurements more than a time or two. It happens. Everyone tends to forget at one point or another. After all, we are human.
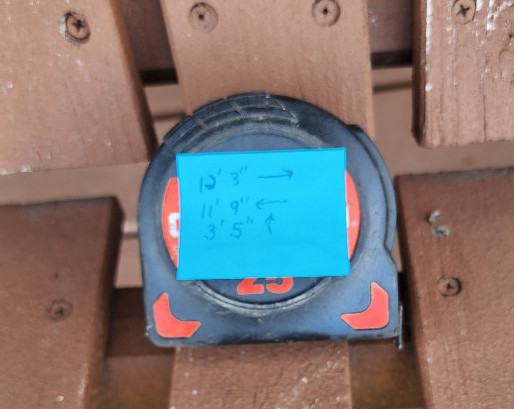
Sticky notes can help. Place the sticky note on the front of your tape measure every time you measure something, write it on the sticky note. When you get back to the saw you have the measurement written down. When you are done with the measurements, cross them out. When the note has no more room, replace it with a new sticky note.
2. Combination Square and Pencil as a Scribe
Here is another trick with a combo square and a pencil. For example, you have a 1×8 board. It is 8 feet long, but the board needs to be 7 1/8” wide.
If you have a combination square with a small hole in the center of the metal ruler, put the tip of the pencil in the hole and move the handle by loosening the thumbscrew and measuring with a tape measure to ensure you have the correct measurement. Tighten the thumbscrew and run the combination square along the 1×8 with the pencil in the pilot hole.
If your combination square does not have a pilot hole, drill a hole big enough for the tip of the pencil.
3. Template Trick With Paper
Placing shelves or wall décor with the infamous keyhole slots can be intimidating. You might find yourself holding your breath or biting your tongue because you don’t want to mess with putting the nick-nacks on the wall due to missing the keyholes by that much!
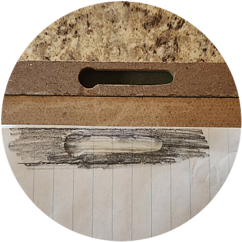
With this paper hack, rest assured you will nail this every time! Take a piece of paper, place it over the keyhole slots and with a pencil shade over the hole. The pencil will highlight the perimeter of the hole.
Place the paper on the wall and put a torpedo level against the wall. Level the torpedo level and lightly scribe under the level. Next, place the paper against the pencil mark and use a screw to push through the paper to mark your holes. There you have it, no more pulling your hair. If you continue without this hack, you might cause yourself uncontrollable hair loss.
4. Sanding Curves
When using my wood lathe and making small wooden handles for noodle boards, I found a trick when sanding curves. These curves were small, and I needed the curves sanded.
I took a pencil and wrapped sandpaper around the pencil and placed it onto the curve. This worked for what I needed, but with more intricate curves, you need to improvise. Sandpaper is flexible and you can wrap and shape whatever you use.
5. Yardstick Trick for Perfect Circles
Why is it, you are always trying for that perfect circle, regardless of the size? Don’t worry. With this no-brainer hack, you will become an expert circle maker in no time. I promise!
Take a yardstick and drill two holes in the center of the yardstick through the wood. One at the 1” mark and the other at the desired diameter. For example, you want an 8” hole. Secure a screw at the 1” hole and place a pencil into the 9” hole. Move the pencil as if drawing a circle. You can thank me later.
6. Cheap Spray Bottle as a Stain Sprayer

The next big “thing”! Just like a lightning bolt, it can strike at any possible moment. This hack is not bad. If you can’t afford an electric sprayer for those small projects, then this hack is for you! I think I was a car salesman in my past life. Did I sell you this idea?
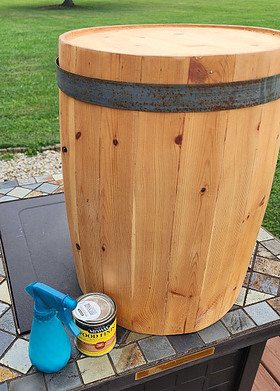
Buy a spray bottle of the size you want from any retail store, like Walmart. It’s cheaper than picking one up from CVS. Sorry CVS, your spray bottles might be a bit pricey. Make sure you stir the stain and pour it into the spray bottle. Turn the tip of the nozzle to control the spray.
With small flicks from your hand and wrist, spray the stain onto your project. If you want, you can put a little bit of an attitude into your work while spraying with a sneering look. Give it a try, you might surprise yourself with the outcome.
7.Unclogging Sandpaper Hack
I have used a lot of sandpaper over the years. But this hack is for belt sander and round sanding discs. Most were rendered useless due to grit buildup or burnt onto the sandpaper and becoming locked into place. What did I do? I replaced it with another and trashed the other. Well, hold on! That changed.
Do you have old sneakers that happen to sneak back into your closet? Well, now you can take care of those sneakers once and for all. Turn on the belt sander or
Take the shoe and hold it firmly in both hands press the sole of the rubber to the belt or round disc. Within no time, the locked debris will come loose.
Eventually, you will need to replace the belt or disc, but this hack will reduce the cost of buying more.
8. Jumbo Paper Clip as a Table Saw Stop Block
Using paper clips is one thing, but a jumbo paper clip! What in the world have we come to? With the jumbo clip, you squeeze the long metal prongs over the miter saw fence and place a small scrap of wood at the desired measurement where you want the cut material to stop. For example, you are cutting a 1×4 and need a 6” cut.
Pull the head of the miter saw down and lock the head into place. Place the tip of the measuring tape blade against the outside of the sawblade and put the wood scrap where you need to stop. Take the jumbo paper clip and place it over the scrap of wood and the fence. This is a favorite of my hacks. I would cut a lot of 30-degree angle cuts for my 3-D tumbling block charcuterie boards.
9. Homemade Standoffs
When painting, staining, or pouring resin over a small flat wood project, you need something that will give you a bit more usefulness. When painting or staining, you must pick up the wood and get paint or stain on your hands.
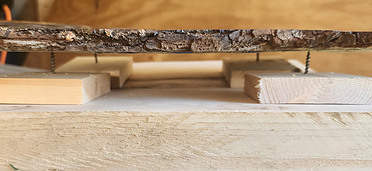
All you need is homemade standoffs. To make these, cut four 3” from a 1×4. Find the center and drill a small hole through the blocks. Next, take a 1 3/4” or 2” drywall screw and screw through the hole in the blocks. The 3” x 31/2” wide block will help distribute the weight.
With resin flat projects, the resin can drip over the edges, and you can clean up the run-offs later. This method will allow you to pick the flat project up and it will not be stuck to the surface, and you will not have to pick and pry at the flat project.
Final Thoughts
Everyone can appreciate saving money and time while getting advice. It’s up to the individual to apply the given knowledge and put knowledge into practice, perfecting the idea hack to better the hack ideas.
As always, practice safety. There is no excuse for neglecting safety.
All thoughts, opinions, comments, and questions are welcome. You can leave them below in the comment sections.
Homer P
